b.jpg)
The bottles on the left and right are filled with glitter. The tassel was already attached when she gave it to me, so I'll let her decide if she wants to remove it. It already had a hole in the top making it easy to add a jump ring instead of wiring it up. The center bottle is full of the smallest pearls I had. All of the bottles have a very small opening, so I was limited to what would fit inside.
b.jpg)
I filled the bottles on the left and right with seed beads, and the center bottle with glitter, then added some rhinestones down the front. She requested the bottle on the right be filled with something green.
I'm sure there are dozens of ways to wire these up, but these two techniques have always worked for me. I had these all put together before I thought of blogging about them, so I'll show you the easiest technique that works for almost any bottle as long as the top isn't too large.
b.jpg) I used 22 gauge wire (open roll on left) because it's easier to work with than the thicker 20 gauge. Then grab yourself a pretty little perfume bottle, preferably one that's already empty because old perfume
I used 22 gauge wire (open roll on left) because it's easier to work with than the thicker 20 gauge. Then grab yourself a pretty little perfume bottle, preferably one that's already empty because old perfume smells bad stinks. It's best to fill the bottle and glue the top on before you start to wire it up. A little E6000 glue will hold the top in place so you don't end up wearing glitter all over your clothes.
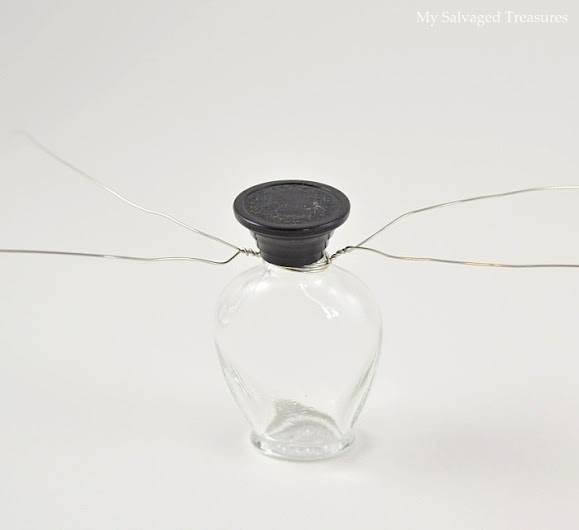
b.jpg) Cut off two pieces of wire about 12" each. Place one piece of wire around the neck of the bottle (this is a top view) cross the wire, pull tight, then pull both ends around to the opposite side and twist a few times to hold it in place. Repeat with the second wire.
Cut off two pieces of wire about 12" each. Place one piece of wire around the neck of the bottle (this is a top view) cross the wire, pull tight, then pull both ends around to the opposite side and twist a few times to hold it in place. Repeat with the second wire.
 You'll end up with something that looks like this. The wires are firmly held in place between the top and the neck of the bottle. You can see some moisture still inside the bottle, so make sure it's completely dry before filling and gluing it. A Q-tip works really well if the opening is large enough.
b.jpg) Continue twisting until you have about 3" of twisted wire on each side, cut off any excess.
Continue twisting until you have about 3" of twisted wire on each side, cut off any excess.
b.jpg) Grab your round-nose pliers and make a loop about 1/8" away from the neck.
Grab your round-nose pliers and make a loop about 1/8" away from the neck.
b.jpg) Hold the loop you just made with your chain-nose pliers. Grab the end of the wire with your fingers or another pair of pliers and wrap it around around a few times until it's right up next to the bottle top.
Hold the loop you just made with your chain-nose pliers. Grab the end of the wire with your fingers or another pair of pliers and wrap it around around a few times until it's right up next to the bottle top.
b.jpg) Cut off the excess and pinch the wire down with your pliers. Repeat on the other side.
Cut off the excess and pinch the wire down with your pliers. Repeat on the other side.
b.jpg) All ready for some embellishments and a chain.
All ready for some embellishments and a chain.
I was able to fill this bottle after wiring it together, but it's best to fill and glue it first so that your wires don't slip off the top. I used E6000 glue for all the embellishments.
b+(3).jpg) I'll be bringing them with me to the Fall Antiques & Collectibles Faire on Sunday. I'm really not crazy about doing custom orders because I constantly second-guess all my creative decisions. Oh dear, I sure hope she likes them.
I'll be bringing them with me to the Fall Antiques & Collectibles Faire on Sunday. I'm really not crazy about doing custom orders because I constantly second-guess all my creative decisions. Oh dear, I sure hope she likes them.
I'm sure there are dozens of ways to wire these up, but these two techniques have always worked for me. I had these all put together before I thought of blogging about them, so I'll show you the easiest technique that works for almost any bottle as long as the top isn't too large.
b.jpg)
b.jpg)

b.jpg)
b.jpg)
b.jpg)
b.jpg)
b.jpg)
I was able to fill this bottle after wiring it together, but it's best to fill and glue it first so that your wires don't slip off the top. I used E6000 glue for all the embellishments.
b+(3).jpg)


b.jpg)


I think she would have to be loony tunes not to LOVE them! What a wonderful tutotial, Betsy! I really like the look of the double-twisted wire loops. Great technique!
ReplyDeleteThis post got my immediate attention as soon as I saw the first picture. :-D I am sure she will be very happy with them - very pretty!
ReplyDeleteI have several tiny bottles that I had thought about doing that with, but I would have to practice wire wrapping a lot more. Yours is so neat looking. I have even watched tutorials on youtube and it is still messy looking.
I love, love, love this. Thank you for the idea and the tutorial. Hugs! xx
ReplyDeleteBetsy how could she not like these! LOVE this idea and yours are beautiful! I am inspired!
ReplyDeletexx
Anne
Gorgeous creations! I'm sure your customer will love them.
ReplyDeleteBeyond cool, Betsy. You should sell bunches.
ReplyDeletethese are SO sweet! I am going to have to give them a try! merci! ;)
ReplyDeleteI love the way each one is unique. I have a small collection of small perfume bottles that I've had for years. I keep them on a small saucer on my dresser. I've never found empty one like this to repurpose. I love them!
ReplyDeleteShe should love them! All the bottles are so cute and each one is unique in it's design. Adorable idea! hugs, Linda
ReplyDeleteVery creative and cute!!
ReplyDeleteSusan
I'm sure she will love them. They turned out really sweet. Is there anything you can't make jewelry out of? So creative!
ReplyDeleteThanks for stopping by and leaving me a comment. I love DIY projects that are interesting and fun. LOVE the pumpkins with attitude post also!!
ReplyDeleteHave a wonderful Sunday,
xxx Liz
Love these... Thanks for including your easy to follow tutorial! I'll bet you get rave reviews on all of these! xo's Pam
ReplyDeleteI'm sure your friend will love the bottle necklaces you made for her. Thank you for the tutorial. Someday, I may give it a try.
ReplyDeleteYou are amazing, I totally love this and bookmarked it!
ReplyDeleteCarol
Great tutorial, Betsy. Such cute little necklaces.
ReplyDeleteOh my these are so adorable!! You come up with the greatest ideas and are so sweet to always freely share how you make things with us!! Thanks so much!
ReplyDeleteTotally Beyond Cool!! Thanks for sharing how you made these!!
ReplyDeleteHuggs, Nancy
How can she not love them? They're fantastic! But I feel ya on the custom order thing...I second guess myself, too.
ReplyDeleteI'm catching up with your posts Betsy. Been so busy lately and I miss reading your posts and artworks.
ReplyDeleteThis is another set of equally creative and genius work from you. So cute and the intricate details make me adore each piece.
Have a great week Betsy!
She will love them...they are adorable, what a great idea to use those sweet little perfume bottles.
ReplyDeleteI think she will love them - I know I would! Thank you for sharing the tutorial. I have many little bottles and maybe I will actually find the time to MAKE something with them one of these days!
ReplyDeleteLove these!!!! It was soooooo good seeing you today!!!!! Get some rest!!!!
ReplyDeletexoxo
These look fantastic. They're so cute. I'm sure she'll love them.
ReplyDeleteLisa
Hi there! Thanks for stopping by and leaving a sweet comment - you had a great idea about engraving an initial in the bracelets :) Your necklaces are stunning and very creative. Enjoy your day!
ReplyDeleteBlessings,
Stephanie
Oh, she will absolutely LOVE them!!! Don't second guess yourself! They are beautiful!!! Thanks for the tutorial, too...great photos!!!
ReplyDeletehi Betsy, doing some catch-up reading tonight. Thanks for a neat tutorial on these perfume bottles; this same technique could be used on other objects, too. Nice, clear close-up photography! I'm intrigued by the other bottles, too, where you've brought the wire up along the sides of the cap and did one twisty loop.
ReplyDeleteYour client will love them all!!
Oh how wonderful! Thank you for showing us how you did it!
ReplyDeleteJust lovely!! I know what you mean about special orders...its so much easier when you just put your creations out and if someone likes it they buy it :) But I'm sure they will love these!! Laurel
ReplyDeleteYour creations are bound to be in high demand whether you create them off the cuff or custom according to request. You also must feel surrounded by riches working with all those amazing little treasures all the time. What you do with the bits and pieces never ceases to amaze me!
ReplyDeleteLiz
These are adorable. Thank you for the fabulous tutorial.
ReplyDeleteSo....did she adore them like we do?
ReplyDeleteShe sure did:-)
ReplyDeleteGreat! I'm inspired. I just got about 7 of them.
ReplyDeleteBtw... you have an amazing blog.
Very wonderful!
ReplyDelete